Search This Blog

Thursday, July 30, 2020

Healthy Low Carb Chocolate Chip Cookies...That Actually Taste Good!

Hey, you people trying to be careful of carbs--or just looking for healthy dessert recipes; this is a good one! Kid-approved at my house!

I adapted the recipe from this blog. She's got some good stuff that I plan to try!

Below I have typed out her basic recipe and how I improvised with what I had on hand at the moment. Let me know if you try them with any variations and how they turn out! I included a few picture to give you an idea of the batter texture. 

INGREDIENTS

·       3/4 cup Softened butter or coconut oil

o   I used what I had, organic salted butter

·       2/3 cup Granular Sweetener

o   She uses Monkfruit, which I would like to try, or Swerve. I had Coconut Palm Sugar and Organic Raw Cane Sugar, so I used 1/3 c. of each.

·       2 Eggs

·       2 tsp Vanilla Extract

·       3 cups Almond Flour

o                      o    I used 2 ½ c. of Superfine Almond Flour and ½ c. of Coconut flour to make it 

                      a little creamier in texture. 

·       1/2 tsp Baking Soda

·       1/2 tsp Salt

·       1/2 of a 9 oz. Bag Sugar-free Chocolate Chips 

o    I did not have sugar-free chips, so I used mini dark chocolate chips that I had on hand.

o    I used about ½ c. - ¾ c. of chocolate chips


INSTRUCTIONS

-     o   Pre-heat oven to 350F

-     o  Add softened butter (or coconut oil) and granulated sweetener to a large bowl 

          and mix on medium until combined

-     o  Add 2 eggs and vanilla and mix until combined

-    o    Combine flour, baking soda, and salt in a medium bowl

-     o  Add dry ingredients a little bit at a time to wet ingredients and mix until combined

-     o  Dump in Chocolate Chips & Mix till combined

-     o  Use small ice cream scoop, make balls of dough and place onto lined baking sheet

-     o  Flatten out the balls of dough by pressing down on the top slightly 

          (The cookies do not really spread.)

-      o  Bake for 10-12 minutes

-     o  Let cool completely and store in an air-tight container for up to 4 days.


After the batter is all combined...

Finished baked texture...

Great cookie texture for Low Carb!


Delicious Iced Coffee...Without All the Sugar...But just as delicious!

Are you like me?

You LOVE coffee, but not all the sugar and highly processed syrups that come with it?

Here is my new favorite healthy alternative to beat the summer heat!

- Brew a cup of your favorite good strong coffee. 
     *I have a Ninja Coffee Bar and brew mine a little stronger for iced coffee, 
       because your ice will water it down a bit.
- While it is still hot, stir in about 1 Tablespoon of Raw Organic Agave Nectar. 
     *I don't like mine super sweet, so you may want to add more if you like a really sweet iced latte.
     *Agave is sold at almost every store on the baking aisle. Looks like syrup in a bottle. But make sure 
       you get raw and organic, otherwise the processed agave isn't much different than syrup!
- Stir in Half & Half to your preference. I use probably about 3 Tbsp. of Half & Half in mine.
- Stir in about 1/8 tsp of Pure Organic Vanilla extract.
- Fill a large shake-able container with ice.
- Pour coffee mixture over ice, shake well and Enjoy immediately.

*I hope you will give this healthy version of iced coffee a try! Tastes just like an iced vanilla latte...without all the processed ingredients and sugar. 

Post your favorite healthy coffee recipes--iced or hot--in the comments for us to try! I am always up for  learning tips from others and trying something new. 

#AllGreatDaysBeginWithCoffee

Thursday, May 7, 2020

This Jambalaya is One of my Faves!

Jambalaya...it's what's for dinner!
This EASY One-Pot Jambalaya is one my FAVES to make! So easy and keeps the mess all in one pot. Healthy & Delicious for a win win!

This recipe is pretty self-explanatory, but you can mix up any of the meats, veggies and seasonings!
I unfortunately have an allergy to ALL peppers, sweet and spicy, so no heat for me. But I always have that hot sauce on hand for my husband to spice his up nicely!

1/3 c. diced celery
1/4 c. diced onion
2-3 cloves of minced garlic
1/4 c. diced zucchini (My mom loves bell pepper in this! I just can't eat them)
2 tbsp. unsalted butter
1 can petite diced tomatoes, no salt
1 1/2 c. chicken broth
2/3 c. rice, uncooked
1 tsp. Italian Seasoning
1/4 tsp. pepper
2 c. Meat of choice, already cooked 
    (I usually cubed chicken or pork, and I LOVE it with shrimp or tilapia or some sausage added in!! But literally whatever meat you have already cooked.)
Saute celery, onion, garlic and zucchini in butter till just tender but still crisp.  Add other ingredients & simmer till rice is tender.
Add whatever you like! My mom loves to add Cajun Seasoning, Hot Sauce and Bell Peppers. 
Enjoy!

Tuesday, April 14, 2020

Think Outside the Sandwich Bag!

Are you struggling to keep lunch different and exciting?
Fun to look at, but still healthy for the kids to eat? 

Below is a list of bread-free sandwich alternatives to keep lunch exciting while stuck at home! 

I know store visits may be rather infrequent right now with COVD-19 guidelines, so we may not have tons of different lunch food varieties. But, just mixing up the way we lay out and serve the lunch foods we have, can make it feel new and exciting for the kids--
...even though they are still getting the same food. :) 
Since we are all at home right now (aka - mandatory home-school moms, can I get a witness!!)
I like to lay my lunch food out family style...less dishes and it looks more exciting, so...win win! 
The kids actually end up eating less & not worrying about the normal sandwich, chips, fruit concept.

Take your Family Style (like ours below) and go outside in the back yard for a picnic!

It's easy to get stuck in the 'sandwich mode' by default, isn't it?

I know their are good bread options out there, and don't get me wrong--we do sandwiches!
But, definitely not every day. I don't always want bread to be the majority of what fills up my kids every day at lunch time, so I am always trying to think outside of the 'sandwich bag' when it come to lunch time. 

If that's you too, or you're just ready for a fresh perspective, here is a lunch list for you! I'll try to post some healthy, easy, no-prep snack option ideas soon. 

Bread-Free Sandwich Alternatives for Healthy but FUN lunch!

- Tuna Salad w/ Organic Blue Corn Chips to dip 
     Other serving ideas - Van's Gluten Free 'Say Cheese' Crackers, or your favorite crackers / bread)
- Refried Beans w/ Cheese w/ Organic Tortilla Chips or Fritos to dip
- Sliced Deli Meat & Sliced Cheese
     Serve w/ pickles, diced veggies & lettuce leaves to wrap, add a little mayo or mustard!
     Alternative - serve whole wheat tortillas to wrap the meat, cheese, lettuce, pickles
- Peanut Butter w/ Dippers...Apples slices & celery or your favorite healthy crackers to spread
- PB Bananas - My kids LOVE doing this one!
     They each get a whole peeled banana spread with natural (no sugar) peanut butter.
     I set out toppings, and they can personalize their PB Banana 
    Topping Ideas: Diced strawberries, mini choc chips, chopped nuts, drizzle of honey or jelly, sometimes mini marshmallows--I mean, it's a skinny banana, they can't fit too many toppings and 4 or 5 mini marshmallows makes that healthy lunch look super exciting!!
- Protein Fruit Smoothies set out what you have and let them have fun each having a turn picking what to put in the blender for their own!
    Add-In Ideas: All kinds of Berries, Bananas, Plain Greek Yogurt w Agave for sweetener, 
- Strawberries and Nutella - Heaven!!!  Enough said...

- Dinner for Lunch! Another Idea my family really enjoyed was flipping the day around and having the table all set and a nice dinner meal ready at lunch time. Then we had our 'snacky' lunch meal with a movie for supper as a reward for finishing schoolwork.

I challenge you to think outside the lunch box or the sandwich bag with this list of ideas! 

Then come back to comment or share your tips or favorites with all of us! (Enter your email above to follow the posts and comments.)

Tuesday, March 31, 2020

A Perfect Way to Start off Your Day...


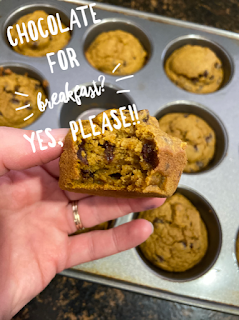
These Pumpkin Muffins are a great start with a cup of coffee! (...or milk for the kids)
...and, seriously, who doesn't want to start the day with chocolate chips? :)
Ingredient Notes: No flour or sugar, contains egg

These are fabulous make-ahead muffins for those quick school or work mornings...whenever we know what that feels like again, huh? Very much kid and husband approved.

I have made these SO many times, they are a definite favorite, go-to recipe very often. I do not remember when or where I got the original recipe--so I cannot share a link. I have tweaked it many times to be what we like.

Last week, I had planned to make these but neither of my 2 store stops had canned pumpkin! (Everyone is going to have canned stuff in the pantry for months that they don't use would be my guess!) So, I used applesauce with a small bit of mashed banana to thicken it up a little. It worked well as a pumpkin replacement and they were tasty--but definitely not as good as the pumpkin!

So, when I saw pumpkin in the store this week, I just had to purchase and make them again.

I figured I would share since this has been one fo our favorites for a while now. Enjoy!

Ingredients:
- 1 Cup Pumpkin Puree
- 2 Eggs
- 1/2 Cup Maple Syrup / Agave (I usually mix the two so I don't use up all of one or the other.)
- 1 Tbsp. Vanilla
- 3 Tbsp. Melted Coconut Oil (You could also use 3-4 Tbsp. Nut Butter of choice)
- 1/4 to 1/3 Cup Unsweetened Vanilla Almond Milk (or your milk choice. Start w/ 1/4 cup add more if too thick)
- 2 1/4 Cup Oats (Pulse to flour before adding)
- 1 Tsp. Baking Powder
- 1/2 Tsp. Baking Soda
- 1 Heaping Tsp. Cinnamon
- 1/2 to 2/3 c. Mini Chocolate Chips (really any you like best, regular size chips would be fine too)

Instructions:
- Preheat oven to 350F (My oven runs hot, so I set it at 340F for my non-stick muffin tins.)
- Grease muffin tins with coconut oil (yields about 15 muffins for me)
- Pulse the oats by themselves till they turn to flour
- Add the Powder, Soda, Salt and Cinnamon, and pulse together well.
- Starting with the wet ingredients, layer everything into a blender or food processor. Blend until smooth. (Scrape down and pulse again if needed.) *At this point, I usually scrape everything into a bowl & give it one quick/gentle stir w/ a spatula to make sure it's well-combined.)
- Stir in the chocolate chips gently with a spatula.
- Spoon batter into greased muffin tins, about 3/4 full. (yields 15 muffins, or for larger divide batter into 12 tins)
- Bake in the oven for 20-22 minutes, until springy to the touch and golden.

Below are some pictures to reference. Let me know if you make them and how they turned out. Enjoy!


Sunday, March 29, 2020

Can You Have Delicious Fluffy Pancakes that are Healthy Too?

Delicious, Fluffy Pancakes that are healthy too? YES PLEASE!!
...And, yes, they can easily be gluten and sugar free. 
Main Ingredients...Oats and Plain Greek Yogurt!

These are weird Sunday mornings, aren't they? If you're like us, and normally used to heading out the door to church with the family on Sunday mornings, mixing up home-made pancakes is not usually on the radar for a busy morning!

However, with our 'new normal' for the present including pulling up our Virtual Church Service (Visit Our Church Website Here!) and sitting on the couch with our Bibles instead, I am trying to find ways to help Sundays still feel special for my kids. Gotta find ways to make-up for the lack of socialization with friends whom they are missing!

Since we are ALL home ALL of the time...I am looking for any little ways to make 'being home' still a special and fun place to be. It is challenging, isn't it? But, I still LOVE home! I love my peeps that call this home, so I am determined to keep looking for ideas to keep it special!

One way to make my family feel 'special and different' can be in mixing up the menu a bit. But...that doesn't have to mean eating tons of junk food as a 'treat.' (News Flash--all those 'treats' are NOT usually a treat for us as parents or for their bodies when they have the emotional / physical crash of repercussions that follow...especially those little people!)

So, while I am VERY ready to have our busy Sunday mornings back--we miss our FBC Family!!--why not plan to have some pancakes on Sunday morning? Special and Different for us! (Plus Dad doesn't have to leave so early for church sermon and building prep, so he gets to sit down and eat with us too! Fun!)

Here is the recipe and a few photos. Enjoy! And, please come back to share if you made this recipe! ...a picture and a few tips of how yours turned out and any addition / substitution you tried! (very easy to make gluten-free and sugar-free) I cannot take credit for the recipe, but I have used it for quite a while, so I am not sure where I got it from! I have just tweaked it to make it my own.

Healthy, Fluffy Delicious Pancake Recipe...


Ingredients:
**Note: This recipe does not have a super large yield--enough for our family of 5 to have 2 pancakes each. So if your family is wishing to wolf-down large amounts, you may want to up by a half recipe or double.
1 Cup of Oat Flour
1/4 Cup Organic All-purpose Flour
   (You can make any flour substitution, I just like the addition of the 1/4 c. for gluten structure, fluffier!)
1 Tsp. Baking Powder
1/2 Tsp. Baking Soda
1/2 Tsp. Salt
1 Tsp. Cinnamon
3 Tbsp. Raw Organic Cane Sugar (Use any granulated sugar substitute)
1 Cup Plain Greek Yogurt (My FAVORITE brand for consistency pictured below!)
1 Tsp. Pure Vanilla Extract
2 Eggs (Lightly Beaten)
2 Tbsp. Milk of Choice (I use Organic Grassfed Whole Milk)

Instructions:
- In a large bowl, mix together, greek yogurt, beaten eggs and vanilla. Whisk till smooth
- In blender, pulse oats till they turn to flour.
- In a small bowl, combine oat flour, all-purpose flour (or your substitution), raw cane sugar (or your substitute), baking powder, baking soda, salt and cinnamon. Whisk till fully combined.
- *Add milk 1 Tbsp. at a time till you like the consistency.
- Heat your griddle and skillet, when hot, coat the surface with butter (or coconut oil)
- Dollop batter on and spread slightly Let cook 3-4 minutes on first side (or till golden)
- Flip and do 2-3 minutes on the other side (or till golden)
- Serve while warm and top with Pure Organic Maple Syrup...and Fresh fruit if desired!

Tips:
*You probably could just do all oat flour, but I feel like that small addition of all-purpose adds a gluten structure so you get more a rise = fluffier pancakes.)
*You can easily substitute any granulated sweetener option you prefer that is measured as sugar.
*See my photo below for the consistency I look for, and remember different flour substitutions will change your consistency. Some flours are more dense and may require more milk to be added. But, also remember that the more liquid you add, the heavier your batter will be and the smaller the rise. So, I recommend using less dense flour options for this recipe.
*Coconut oil would be a lighter option to grease your griddle or skillet, but I use butter, because...BUTTER!
*Are there other weird people out there (like *someone* in my home) who like peanut butter on their pancakes? Eeeww! Not me!
*There are a LOT of healthy pancake recipes out there, believe me, I have tried most of them! I do like one other applesauce pancake recipe, maybe I will share another time. But, hands down, this one is my FAVE. It's so fluffy and delicious every time! Enjoy your pancake mornings...or mix it up...Pancakes with fresh fruit for supper. Fun!

My favorite Greek Yogurt brand, the consistency is perfection...


Spread them out a little, batter should be a little thicker...

Ready to flip...

Ready to EAT!! (With Maple Syrup, of course!)

Friday, March 27, 2020

Healthy Peanut Butter Chocolate Chip Blondies...

Just tried these tonight, and YUM! 
If you like the chocolate & peanut butter combo, you need these in your life!

These are an easy mix-up for those kids stuck at home to help out with, no mixer needed. I enjoyed some time with my daughter in the kitchen tonight after dinner while the guys mowed the lawn. Just a big bowl, a spoon, some fun Disney Princess music, finger-licking, laughing and eating quite a few extra chocolate chips! :)

*No egg, and easy to substitute flour and sugar! (See my ingredients/tips below.)
**I would say you could change out the peanut butter for any nut butter, or allergy friendly alternative. However, it is a large part of the recipe consistency, so you can't just omit the peanut butter. 
**Post a comment and picture to show us if you tried something different!  

I've been trying to think of fun little things to make memories with our kids during these unusual days at home; so, after baking and cooling our blondies, we packed them up, all put on our pajamas and went for a ride out in the orchards to eat our snack and look at the stars! Fun and special memories!

...AND we are seriously celebrating making it through 2 weeks of homeschooling without killing each other and accomplishing all of our work so far. Yeah, that is worth celebrating people!

So, here is another good one for you to try! (I did use a little bit of sugar in this one, only because I ran out of my healthier sugar alternative and I figured the liquid sweetener would alter the consistency too much. Feel free to experiment and share what you came up with! I love hearing other people's ideas substituting different healthy flour and sweetener alternatives that they have on hand.

Here is the link for where I got the recipe...
Healthy Blondie Bars
...and below is my adaptation. Enjoy and Happy Baking!

Peanut Butter Chocolate Chip Blondie Bars

Ingredients:
2 Cups Peanut Butter (Or your choice of substitution)
1/2 Cup Applesauce
2 Tsp. Pure Vanilla Extract
3/4 Cup Flour (I used Spelt flour this time and it was great.)
1 Tbsp. Baking Soda
1/4 Tsp. Salt
1/2 Cup Milk of Choice (I used Grass-fed Organic whole milk)
1/2 Cup Chocolate Chips
1 Cup Sugar
*The recipe calls for this, listed below was my alternative sweetener combo, what I had on hand...
   - 1/4 c. raw organic agave (since spelt flour is a little more dense mine could handle a bit of liquid)
   - 1/4 c. Coconut Palm Sugar (I personally do not prefer to use too much of this at once--strong flavor)
   - 1/2 Cup White Sugar (This was the only other granulated sweetener in my house at the moment!)

Instructions:
Preheat Oven to 350 F, and line a 9x13 glass pan with parchment paper.
Stir together the peanut butter, applesauce, and vanilla till well combined.
Whisk together the flour, salt and baking soda
Pour your dry ingredients, your sugar/sweetener and your milk (you may not need all the milk depending on your flour) into the peanut butter mixture. Grab a big spoon and slowly stir it all together--combine well. Stir in your chocolate chips.
Spread into your parchment-lined baking pan and pop in the oven for 20 min.
Remove from the oven and allow to cool on a baking rack in the pan for at least 30-40 min. Remove blondies by the parchment paper and allow to cool an additional 30 min.
Once completely cooled, slice and enjoy with a nice glass of milk or cup of coffee!
Store at room temperature or in the fridge if you prefer them firm.

Tips:
*Try any flour substitution you would like, but remember each is a bit different with how much it absorbs. So, you may need to try a couple times to get the consistency how you like it.
*A good 'go to' for a cheap and healthy flour substitution is Oats! Just grind them up in the blender or food processor for a few seconds and you have oat flour. I use this all the time in my baking.
*1 Tbsp is a LOT of baking soda in a recipe and I do feel it left a teeny bit of that bicarbonate taste behind. Next time, I may experiment with a little baking powder along with a little less soda.
*Coconut Palm Sugar has a very distinctive taste, that is why I used only a little. I could not taste a difference with only 1/4 cup. I would love to hear what you tried as sweetener!
*Very easy to use any flour or granulated sugar substitute for this recipe, for gluten or sugar free.
*Just put in half the milk at first and stir to see if you need it all. I did use all of my 1/2 cup.
  (See my photo if you're not sure about your batter consistency.
    It should be spreadable like brownie batter.)
*I used Ghirardelli Dark Chocolate baking chips and a few mini chocolate chips. It's what I had. Mix it up and try any baking chips you like! You could add an extra crunch w/ a few nuts.
*Don't forget the parchment paper if you have it! Seriously, it lifts right out and NO dish to clean!
*I cooked mine 5 minutes longer than the recipe stated, and I did let them cool a long time, but not an hour. We were ready to go and I felt they were still a little too warm to slice, so I popped them in the freezer for 5 min. They were perfect and easy to cut!
*See photo below for consistency and ingredients. Come back and comment to tell me how yours turned out!
   Happy and Healthy Quarantine Baking!

Ingredients I used...

Batter Consistency - Just like brownies

Spread in the pan about to bake

All done! I was surprised how much they puffed up! 

The delicious finished product! Enjoy!


Tuesday, March 24, 2020

Crazy Good--Super Healthy Brownies for COVID-19 Quarantine Days!

Do You Need Chocolate right now, people? 
Yeah...ME TOO! (And coffee...lots of coffee.)

 But here's the thing, you don't have to drown your body in bad ingredients to enjoy a decadent treat! (Just a little planning ahead for the grocery store.) And, if you're looking for easy prep, this is it--just a blender and a baking pan. That's it! AND--No flour, no sugar, no eggs, but LOTS of flavor! (which makes them great for families with food allergies, also!)
 I have adapted a recipe from the following link...Healthy Brownies   Chocolate Covered Katie has some awesome ideas too! Lots of good ideas out there for healthy recipes, and I’m thankful for all those who create! I like to find a recipe for something I want to make and use it as an idea--almost like a template--and then make it my own. 
So, you want to know the secret ingredient? Here it is...
Yes, seriously, black beans! Hey, don't knock it till you try it! 

Nope, I did NOT tell my family what was in my recipe till after they tried it so they wouldn't back out on me. :) Sometimes those kids (and others, who shall be nameless...) need a taste-test to convince them before they know it's 'healthy.' I will share the recipe, and then share my tips afterwards. It does sometimes take a little tweaking to get the texture right, but it's worth trying a few times, I Promise! This is a definite family favorite at our house when it comes to healthy treats--and one that gave me bravery to step out of the box and try some new things in my recipes!
So, here you go...be brave and give it a try! 
    If the first batch isn't perfect, don't give up after the first try! Mine improved each time I made it. The ones I made today were SO SO yummy. I had to hide them so we had some left. 
**Tips included at the end of the recipe, some things I have done different with the recipe along the way to make it just right for us.

Black Bean Brownies...

Ingredients:
1 15 oz. can black beans (drained & rinsed very well) 
2 Tbsp. Unsweetened Cocoa Powder 
½ Cup Quick Oats  (I imagine you could experiment w/ other flours if you prefer!)
¼ Tsp. Salt
½ Cup Pure Maple Syrup, Honey, or Agave (I use mostly organic maple syrup w/ a little raw agave)
¼ Cup Coconut Oil (Melt it first, otherwise it won't combine well at all.)
2 Tsp. Pure Vanilla Extract
½ Tsp. Baking Powder (heaping)
½ Cup Chocolate Chips (I use the mini baking chips, the 'Enjoy' brand--See ingredients picture)
Optional: sprinkle more chips on top before baking
       
      Instructions: (SO easy!)
  •       Preheat oven to 350 F. 
  •       Combine all ingredients except chips in a blender or food processor, and blend until completely smooth. *Really blend well. (I only have a Nutri-Bullet since my blender broke. I have read that the food processor may work very well, maybe even better for this recipe. Whatever you use--it must be blended together very well! Scrape the sides, and stir it together and blend again if needed.) 
  •       Stir in the chocolate chips, then pour into a greased 8×8 glass pan. 
  •       Optional: sprinkle extra chocolate chips over the top. 
  •       Cook the black bean brownies 15-18 minutes, then let cool at least 10 minutes before trying to cut. 
  •       Makes 9-12 small Brownies 

Tips:

*Make sure you rinse the beans really well--get rid of all the salty liquid taste. But also make sure they drain good in your strainer. You don't want the extra liquid. I usually wash them first and then let them sit to drain while I measure the other ingredients.
*I pulse the oats in the blender with all the dry ingredients first, so it turns almost to a flour and mixes in all the dry ingredients together well. (I don't have a large food processor, so the texture might be just fine to dump it all in there if you have one. I haven't tried, so...)
*If you have a Nutri-Bullet like me, I put in the wet ingredients first so they fall down through the wet when I turn it over. It mixes much easier that way. I still open the lid and scrape the sides down once or twice to make sure it's all combined well. (If you only have one top for your Nutri-Bullet, I would pour out the 'flour' mixture after pulsing and then begin layering ingredients w/ wet first.)
*After I blend well, I usually scrape batter out into a bowl to stir in the chocolate chips with a spatula and make sure all ingredients are well-combined, not 'chunky.'
*Once I spread the batter into a greased pan, I sprinkle with a few extra mini chocolate chips before baking.

I will add a pictures below of my ingredients and a few pictures to give ideas of texture. Come back and comment if you try it out. Let me know your thoughts or fun things you created with your own! 
  Have fun, and make some happy moments during this crazy days of quarantine. I read somewhere that these days stuck mainly indoors will be our kids 'walking up the hill both ways in the snow' days to tell their children someday! So, make some fun and healthy memories in the kitchen!


A Healthy Take on BJ's Pizookies? Yes PLEASE!

 Ever been to BJ's Brewhouse and order a Pizookie? Yuuummmm! My favorite! Wouldn't you love to enjoy the 'Yum' without all t...